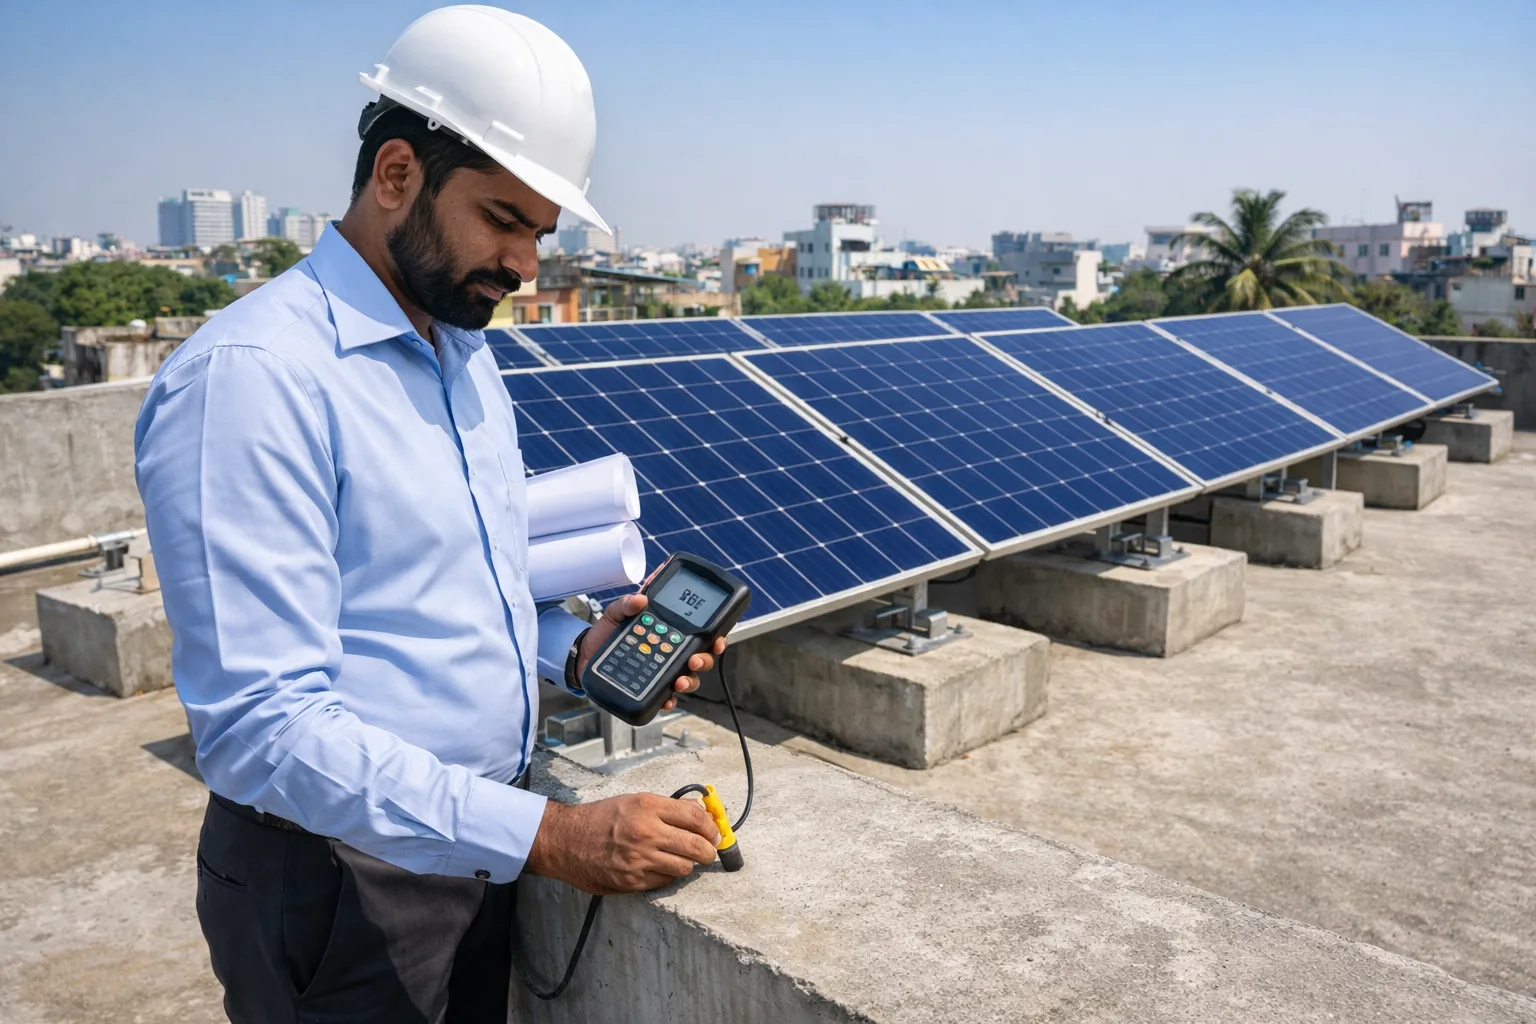
You stand on your terrace in Mumbai, Delhi, or Bengaluru and look up at the sun beating down on your RCC (Reinforced Cement Concrete) flat roof. That same sunlight—driving your electricity bill higher every summer—could be powering your home instead. For the 70% of urban Indian homes built with flat RCC roofs, rooftop solar is not just feasible; it is perfectly suited to this roof type.
But here is the catch: installing solar panels on an RCC roof is not as simple as bolting some panels down and calling it a day. You need to understand waterproofing (no one wants leaks during monsoon), structural load capacity (an RCC slab can handle weight, but how much?), mounting structures (penetrating vs non-penetrating), MNRE technical specifications, safety protocols, and local DISCOM approvals.
This step-by-step guide explains exactly how to install solar panels on RCC roofs in Indian tier 1 cities—covering pre-installation checks, RCC roof waterproofing for solar, mounting structure options, weight distribution, installation process, safety measures, and realistic cost breakdowns for 2026.
Why RCC Flat Roofs Are Ideal for Solar Panel Installation
RCC flat roofs are the most common rooftop type in urban India—found on apartments, independent houses, and commercial buildings from Chennai to Kolkata. They offer several advantages for solar installation:
• Strong load-bearing capacity: RCC slabs can typically support 15–25 kg/m² additional load (solar systems add 15–20 kg/m²)
• Easy installation access: Workers can move freely without the steep-slope challenges of tiled roofs
• Optimal tilt angles: Panels can be mounted at 10–15° tilt for maximum efficiency in Indian latitudes (8°N to 35°N)
• Monsoon resilience: Properly waterproofed RCC roofs handle heavy rainfall when installation is done correctly
• Cost-effective mounting: Less structural reinforcement needed compared to metal sheet or asbestos roofs
According to MNRE technical specifications and industry standards (IS 875 Part 3 for wind load), RCC roofs remain the preferred choice for residential and commercial solar installations across tier 1 Indian cities.
Pre-Installation Assessment: Is Your RCC Roof Ready?
Before a single panel touches your roof, conduct these five critical checks. Skipping these can lead to structural damage, water leakage, or underperformance that wipes out your ROI.
1. Structural Load Capacity Assessment
A typical 3 kW solar system weighs 600–750 kg (panels + mounting + ballast if used). That translates to roughly 15–20 kg/m² distributed load. Most modern RCC slabs (150mm thick) can handle this comfortably. However:
• Buildings older than 20–25 years may have degraded concrete strength
• Lightweight RCC slabs (100mm or less) require structural engineer assessment
• Coastal city RCC (Mumbai, Chennai) may have corrosion-related weakening
Mandatory Step
Hire a structural engineer to assess load-bearing capacity before installation. This costs ₹2,000–₹5,000 but prevents costly roof failures. A 2020 incident in Ahmedabad saw a 5 kW system cause slab cracking due to skipped load assessment.
2. Roof Condition & Waterproofing Check
Your panels will sit on the roof for 25 years. Existing roof issues—cracks, seepage, poor waterproofing—will worsen under solar installation. Check for:
• Visible cracks or water stains on ceiling (indicates leakage)
• Ponding water after rain (poor drainage)
• Existing waterproofing membrane age (if >10 years, re-apply before solar)
• Parapet wall integrity (prevents water ingress)
3. Shadow Analysis & Usable Area Calculation
Measure shadow-free area throughout the day. Water tanks, neighbouring buildings, chimneys, and trees cast shadows that reduce efficiency by 20–30%. You need approximately 100 sq ft (9.3 m²) per kW of solar capacity.
Example: For a 3 kW system, you need ~300 sq ft shadow-free space. Leave 2–3 feet clearance from parapet walls to avoid edge shading.
4. Accessibility & Safety Evaluation
Safe installation requires:
• Proper staircase access (ladders are unsafe for carrying heavy panels)
• Minimum 2 feet walking space between panel rows for maintenance
• Safety railings on high-rise terraces (mandatory for buildings >15m height)
5. Future Roof Use Planning
Once panels are installed, they occupy that space for 25 years. Map out future needs—additional floors, water tanks, AC outdoor units, terrace gardens. Consider elevated mounting structures if you need usable space below panels.
RCC Roof Waterproofing for Solar: Critical Steps
Monsoon leaks are the #1 complaint from homeowners after solar installation. This is almost always due to poor waterproofing preparation or careless drilling. Here is how to waterproof your RCC roof properly before solar installation:
Step 1: Inspect & Repair Existing Waterproofing
Before any solar work begins, inspect the entire roof surface. Repair all cracks using polyurethane or epoxy-based crack fillers. If waterproofing is older than 10 years, re-apply a fresh membrane coating.
Step 2: Choose the Right Waterproofing Method
Common waterproofing methods for RCC roofs in India:
• Cementitious waterproofing (₹30–₹50 per sq ft): Budget option, lasts 5–7 years
• Acrylic/polymer-based coatings (₹50–₹80 per sq ft): Mid-range, lasts 8–12 years, popular in tier 1 cities
• Bitumen membrane (₹80–₹120 per sq ft): Premium, lasts 15–20 years, best for coastal areas
Step 3: Apply Waterproofing BEFORE Mounting Installation
Critical sequence: Waterproof → Let cure for 48–72 hours → Then install mounting structures. Never reverse this order. Apply waterproofing at least 6 inches beyond the solar panel installation area.
Step 4: Seal All Penetration Points (If Using Anchor Bolts)
If your mounting system requires drilling into the RCC slab, each anchor bolt hole must be sealed with chemical grouting or polyurethane sealant immediately after installation. Use MS (Mild Steel) or SS (Stainless Steel) anchor bolts with rubber washers for waterproof seal.
Pro Tip: Non-Penetrating Alternative
If waterproofing is a major concern, use ballasted (non-penetrating) mounting structures that sit on concrete blocks without drilling. This eliminates leakage risk entirely. Ballast adds 10–15 kg/m² load—ensure your RCC can handle it.
Solar Panel Mounting Structures for RCC Roofs: Options Explained
Mounting structures are the backbone of your solar installation. They determine tilt angle, wind resistance, and waterproofing integrity. For RCC roofs in India, two main types are used:
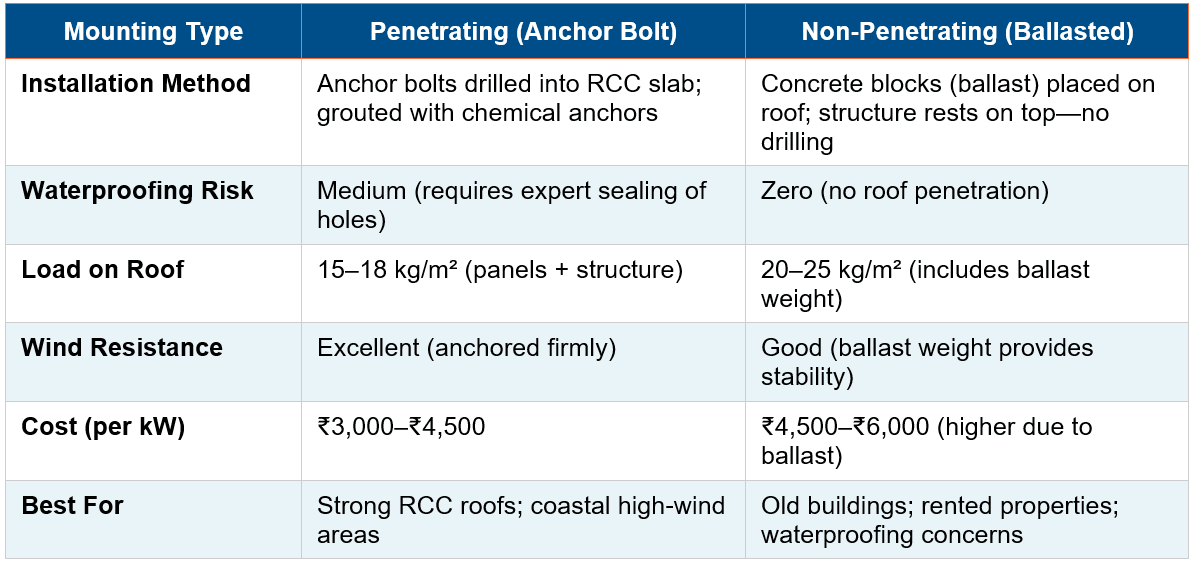
Structure Material & MNRE Standards
All mounting structures must be:
• Hot-dip galvanized (HDG) steel with minimum 80 microns coating (as per MNRE/IS 4759:1996)
• Designed for 150 km/h wind load (IS 875 Part 3)
• Minimum 25-year design life
• 10–15° tilt angle for optimal energy generation in Indian latitudes
Installation Note
In tier 1 cities like Mumbai and Chennai (coastal), prefer anchor bolt systems for superior wind resistance during cyclones. In Delhi, Bengaluru, Pune (inland), ballasted systems work well and save waterproofing headaches.
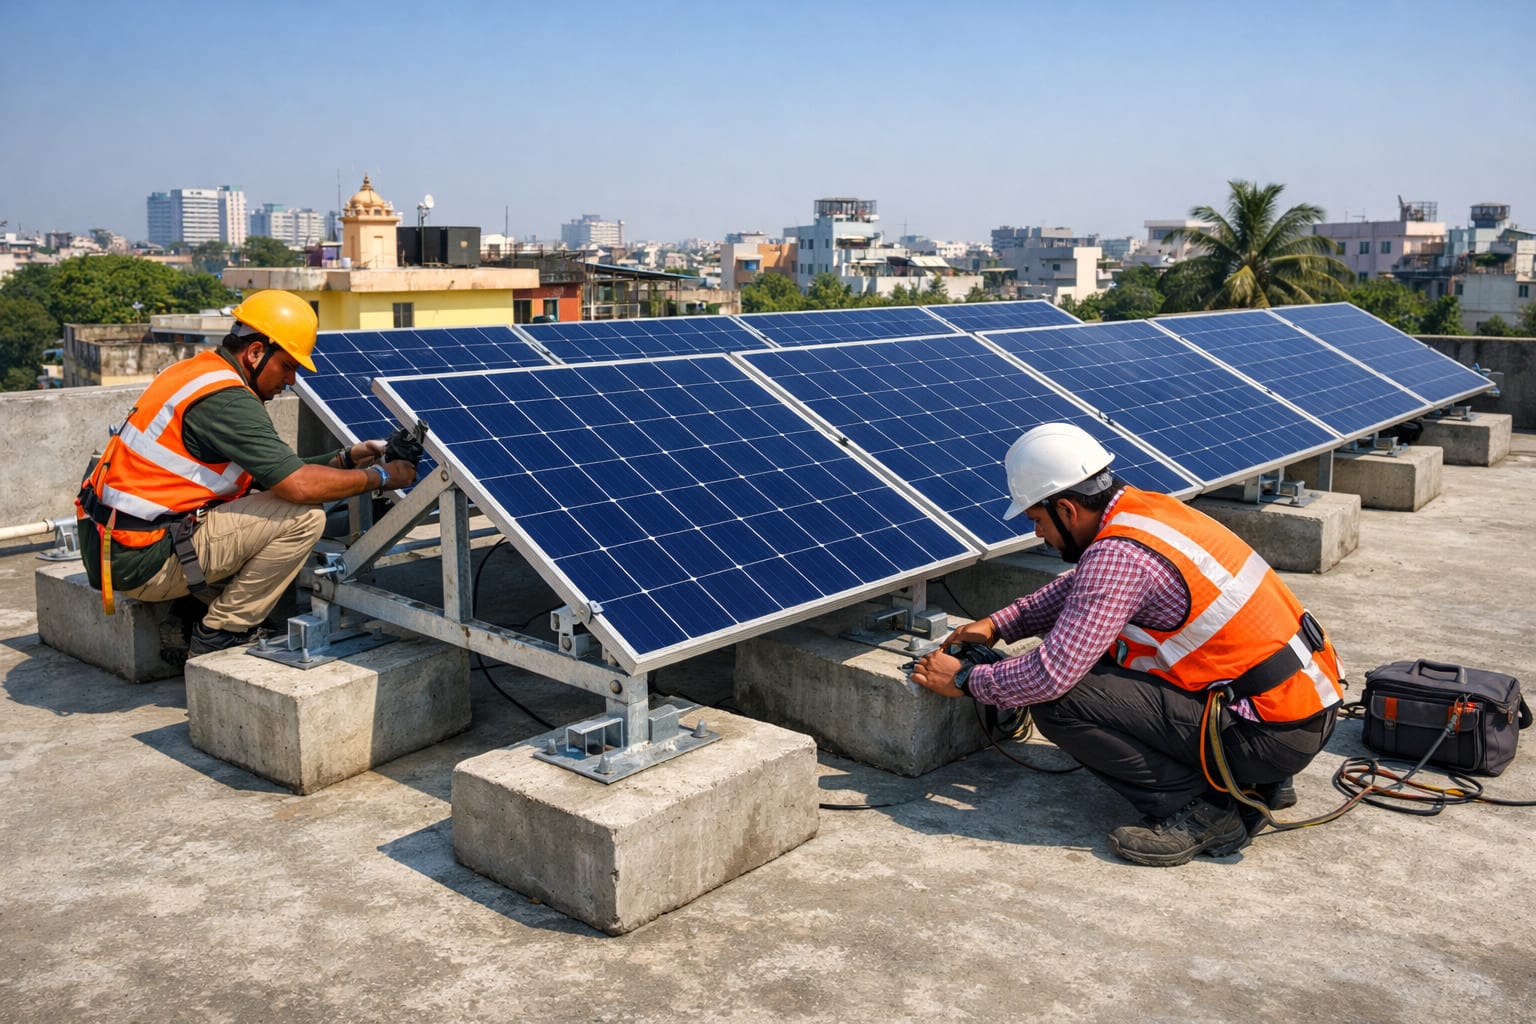
Step-by-Step Solar Panel Installation Process on RCC Roof
This is the actual installation workflow followed by DISCOM-empanelled vendors across India. Total installation time for a 3 kW residential system: 3–5 days.
Phase 1: Site Preparation & Layout Marking (Day 1)
1. Clean the RCC roof surface thoroughly—remove debris, dust, loose concrete
2. Mark panel layout using chalk lines, accounting for shadow-free area, walkways, and drainage paths
3. Verify all materials are on-site: panels (ALMM-compliant), inverter (BIS-certified), mounting structure, cables, MCBs, earthing materials
4. Set up safety barriers, harnesses, and PPE (Personal Protective Equipment) for workers
Phase 2: Mounting Structure Installation (Day 1–2)
For Anchor Bolt Method:
5. Drill holes at marked positions using rotary hammer drill (16–20mm diameter, 150–200mm depth)
6. Clean holes with compressed air to remove concrete dust
7. Insert chemical anchor capsules or inject epoxy resin
8. Insert galvanized anchor bolts (M12 or M16 size) and allow 24 hours curing time
9. Apply polyurethane sealant around each bolt after curing
10. Attach mounting rails (C-channels or L-angles) to anchor bolts using nuts and washers
For Ballasted Method:
11. Place pre-cast concrete ballast blocks (50–80 kg each) at marked positions
12. Level blocks using shims if needed
13. Secure mounting structure base plates to ballast blocks using M10/M12 bolts
14. Assemble triangular frame rails (provides 10–15° tilt)
Phase 3: Solar Panel Mounting (Day 2–3)
15. Carry panels to roof using proper lifting equipment (never drag panels—scratches cause micro-cracks)
16. Attach panel mounting clamps to rails (4 clamps per panel minimum)
17. Position first panel and secure with clamps
18. Connect subsequent panels in series/parallel configuration as per system design
19. Ensure 10–15mm gap between panels for thermal expansion
20. Ground all panel frames using earthing wire (6mm² copper or 16mm² aluminum as per IEC 62305)
Phase 4: Electrical Wiring & Components (Day 3–4)
21. Run DC cables from panel junction boxes through cable trays/conduits to inverter location
22. Install DC isolator near panels (for maintenance shutoff)
23. Connect DC cables to inverter input terminals (observe polarity!)
24. Install inverter indoors or in shaded area (never in direct sun—reduces lifespan)
25. Wire inverter AC output to AC distribution board via MCB/MCCB
26. Install earthing system: earth pit + GI strip + earth electrode (ensure <5 ohms resistance)
27. Install lightning arrestor if building is in high-lightning zone
Phase 5: Net Metering Setup & Commissioning (Day 4–5)
28. DISCOM inspector visits to verify installation meets technical standards
29. Bi-directional meter installed by DISCOM (measures import/export)
30. System switched on for first time; voltage, current, and power output checked
31. Test net metering functionality (export excess power to grid)
32. Vendor provides commissioning certificate and 5-year warranty documents
33. Homeowner receives training on system monitoring and basic troubleshooting
Tip:
DISCOM inspection can take 7–15 days to schedule in busy tier 1 cities (Mumbai, Delhi). Apply for net metering approval online immediately after installation to avoid delays in subsidy disbursement.
Solar Panel Installation Safety: Must-Follow Protocols
Solar installation involves working at height, heavy lifting, and live electrical connections. Professional installers must follow these safety protocols to prevent accidents:
Personal Protective Equipment (PPE) — Non-Negotiable
• Safety helmets with chin straps (protects from falling objects)
• Safety harnesses and lifelines for roofs >3 meters height
• Anti-slip safety shoes with steel toe caps
• Cut-resistant gloves for handling panels (edges are sharp)
• Safety goggles for drilling operations
• High-visibility vests for easy worker identification
Safe Lifting & Material Handling
• Never lift panels alone—minimum 2 workers per panel (panels weigh 18–25 kg each)
• Use proper lifting straps or suction cup lifters
• Maintain crane speed below 10 km/h when hoisting materials to roof
• Secure panels to lifting equipment with rated shackles (never use ropes alone)
• Clear the lifting path of obstacles before starting
Electrical Safety During Installation
• Work on DC wiring only during daylight when panels are covered (to prevent shock from generated voltage)
• Use insulated tools rated for 1000V DC
• Test voltage with multimeter before touching any connection
• Never work alone on electrical connections—always have a buddy present
• Keep fire extinguisher (CO₂ type) on site for electrical fire emergencies
Job Safety Analysis (JSA)
Before starting work each day, conduct a 10-minute safety briefing covering: weather conditions (no work during rain/high wind), task assignments, hazard identification, emergency procedures. This is mandatory for all MNRE-compliant installations.
Rooftop Solar Installation Cost Breakdown for RCC Roofs (2026)
Understanding the complete cost helps avoid surprise expenses. Here is a detailed breakdown for a typical 3 kW residential system on an RCC roof in tier 1 cities:
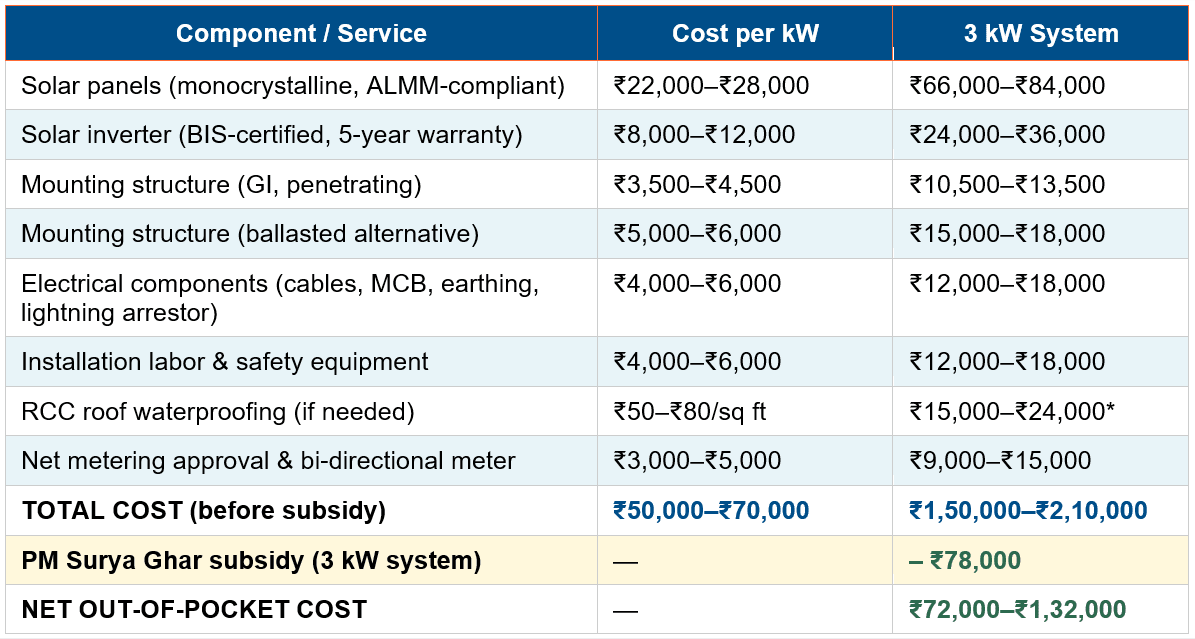
*Waterproofing cost applies only if roof needs fresh coating (300 sq ft area × ₹50–80/sq ft). Not required if waterproofing is <3 years old and in good condition.
Common Mistakes to Avoid When Installing Solar on RCC Roofs
Learn from others' expensive errors:
1. Skipping Structural Load Assessment
Installing without engineer approval. A 2020 case in Surat saw RCC slab develop cracks after 5 kW installation—₹2.5 lakh in repair costs. Always get a structural engineer sign-off (costs ₹3,000–₹5,000).
2. Poor Waterproofing or Wrong Sequence
Drilling anchor bolts before waterproofing, or using cheap sealants. Result: Monsoon leaks within 6 months. Correct sequence: waterproof → cure → install → seal penetrations.
3. Using Non-ALMM Panels to Save Money
Non-ALMM panels disqualify you from PM Surya Ghar subsidy. You save ₹5,000 on cheaper panels but lose ₹78,000 in subsidy. Never worth it.
4. Blocking Roof Drainage Paths
Panels installed over drains cause water ponding, which damages waterproofing. Always maintain 2-foot clearance from all drains and scuppers.
5. DIY Installation to Cut Costs
Solar installation requires technical expertise, safety training, and proper tools. DIY installations void warranties, create safety hazards, and often fail DISCOM inspection—making you ineligible for net metering. Always hire DISCOM-empanelled vendors.
Conclusion & Key Takeaways
Installing solar panels on your RCC flat roof is one of the smartest financial and environmental decisions you can make in 2026. With proper planning—structural assessment, waterproofing, choosing the right mounting system, following MNRE standards, and hiring qualified installers—your solar system will generate clean electricity for 25+ years without a single leak or structural issue.
Quick recap: Assess load capacity (hire an engineer for ₹3K–₹5K). Waterproof before installation (₹50–₹80/sq ft). Choose mounting system based on roof condition (penetrating for new roofs, ballasted for old/rented). Follow MNRE technical specs (ALMM panels, BIS inverters, 80-micron HDG structure). Prioritize safety (PPE, lifting protocols, electrical precautions). Budget ₹1.5–₹2.1 lakh for 3 kW before subsidy, net cost ₹72K–₹1.32 lakh after PM Surya Ghar CFA.
Ready to go solar? Get a free rooftop assessment from a DISCOM-empanelled Worex Solar installer and start your journey to energy independence today.
Frequently Asked Questions (FAQ Schema)
Q: Can I install solar panels on an old RCC roof (20+ years old)?
A: Yes, but only after a structural engineer assesses the load-bearing capacity. Old RCC may have concrete degradation or steel corrosion (especially in coastal cities). The engineer will recommend strengthening measures if needed. Budget ₹15,000–₹50,000 for slab reinforcement if required.
Q: What is the best way to waterproof RCC roof before solar installation?
A: Apply polymer-based or bitumen membrane waterproofing (₹50–₹120 per sq ft) BEFORE mounting installation. Let it cure for 48–72 hours. If using anchor bolts, seal each penetration with polyurethane sealant immediately after drilling. For zero-leak guarantee, use ballasted (non-penetrating) mounting structures.
Q: How much weight can a standard RCC roof support for solar panels?
A: Most modern RCC roofs (150mm thick) can support 15–25 kg/m² additional load. A 3 kW solar system adds ~15–20 kg/m² (panels + structure). Ballasted systems add 20–25 kg/m². Always verify with structural engineer—never assume capacity based on age or appearance.
Q: Do I need to drill holes in my RCC roof for solar installation?
A: Not necessarily. Penetrating systems (anchor bolts) are common for strong roofs and high-wind areas. Non-penetrating (ballasted) systems use concrete blocks—no drilling required. Ballasted is ideal for old buildings, rented properties, or if waterproofing is a concern. Cost is ₹1,500–₹2,000 more per kW.
Q: What safety equipment is mandatory for solar panel installation on RCC roofs?
A: PPE includes: safety helmets, harnesses (for roofs >3m height), anti-slip shoes, cut-resistant gloves, safety goggles, high-visibility vests. Electrical work requires insulated tools rated 1000V DC. Fire extinguisher (CO₂ type) must be on-site. Professional installers conduct Job Safety Analysis (JSA) daily.


