Solar Inverter Error Codes and Solutions: Complete Troubleshooting Guide for Indian Homes (2026)
It's a scorching summer afternoon in Delhi. Your air conditioner is working overtime, and your solar panels are soaking up the sun. Suddenly, you notice a red light blinking on your inverter. A strange code flashes on the screen—E008. Your solar system has stopped generating power. Panic sets in. Is it a major failure? Will you have to spend thousands on repairs?
If this sounds familiar, you're not alone. Every Indian homeowner with a solar system will eventually face an error code on their inverter. The good news? Most inverter errors are simple to fix without calling a technician. You just need to know what the codes mean.
This comprehensive troubleshooting guide covers the most common solar inverter error codes in India, what they mean, and step-by-step solutions to get your system back up and running. We'll cover brands like Luminous, Growatt, Sungrow, Microtek, and more. Keep this guide handy—it might just save you a service call and keep your home powered.

Before You Begin: Safety First!
Before we dive into troubleshooting, a critical warning. Solar systems generate high-voltage DC electricity that can be lethal. Always follow these safety rules:
- Never open the inverter casing unless you are a qualified electrician. There are no user-serviceable parts inside.
- Turn off the system before inspecting any connections. Locate your DC disconnect (from the panels) and AC disconnect (from the grid) switches.
- Wait 5-10 minutes after switching off before touching any wiring—capacitors inside the inverter hold dangerous charges.
- If you're unsure, call a professional. Your safety is worth more than saving a service call fee.
Now, let's troubleshoot.
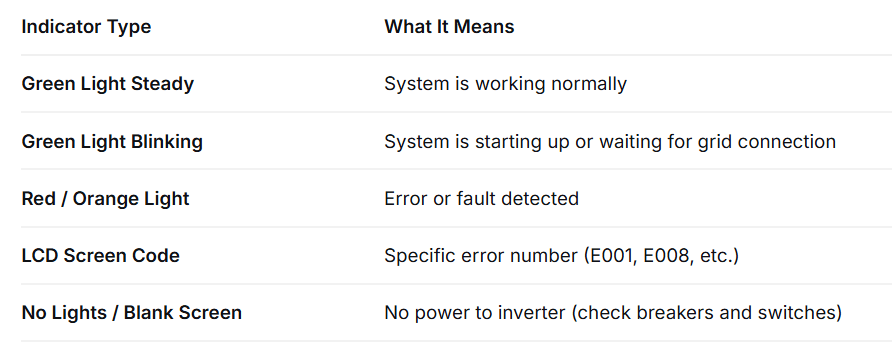
Understanding Your Solar Inverter Display
Your inverter communicates with you through lights and codes. Understanding what you're looking at is the first step.
Types of Error Indicators (LED Lights vs LCD Screen)
Common Inverter Brands in India and Their Error Codes
Different brands use different code systems. Here's a quick reference:
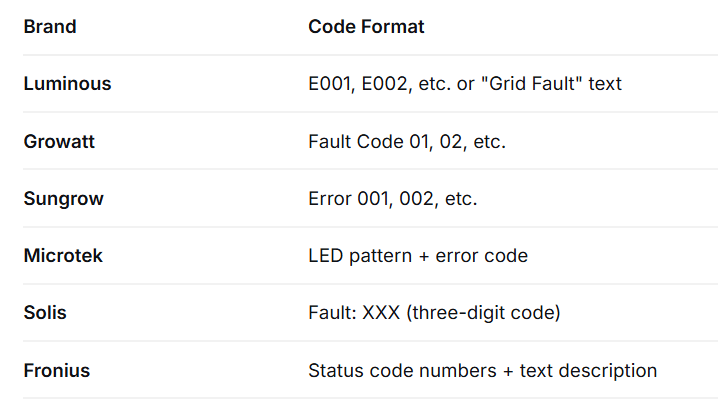
This guide focuses on the most common codes across all brands.
Most Common Solar Inverter Error Codes and How to Fix Them
Let's go through the errors you're most likely to encounter, ranked by frequency.
Error E001 / E002 / E003: DC Overvoltage / DC Undervoltage / DC Overcurrent
What It Means:
- E001 (DC Overvoltage): The voltage coming from your solar panels is too high for the inverter to handle. This often happens in winter when panels run cooler and produce higher voltage, or if too many panels are connected in series.
- E002 (DC Undervoltage): The voltage from your panels is too low. This usually occurs early morning, late evening, or on very cloudy days.
- E003 (DC Overcurrent): The current from the panels is too high, often due to a short circuit or faulty wiring.
Solutions:
- For E002: This is often normal during low-light conditions. If it persists during peak sunlight (10 AM - 3 PM), check if your panels are heavily shaded or dirty. Clean them with water and a soft cloth.
- For E001: This is more serious. Check if your system was installed recently—the installer may have connected too many panels in series. Contact your installer to verify the string configuration. In some inverters, this error can also indicate a failed MPPT (Maximum Power Point Tracker) channel.
- For E003: Turn off the DC and AC switches. Visually inspect the DC wiring from your panels for any signs of damage, loose connections, or burn marks. If you see anything suspicious, call an electrician immediately.
Error E004 / E005: Grid Overvoltage / Grid Undervoltage
What It Means:
These are among the most common errors in India. Your inverter constantly monitors the grid voltage. If the grid voltage goes outside the acceptable range (typically 180V-270V for single-phase systems), the inverter shuts down for safety.
Solutions:
- Check your area: Is there a power cut or voltage fluctuation in your neighborhood? If yes, wait for the grid to stabilize. The inverter will automatically restart when voltage returns to normal.
- Check your AC breaker: Ensure the AC breaker (connected to your mains) is not tripped.
- Check connections: Loose wiring between the inverter and the main distribution box can cause voltage drops. Tighten any loose connections (with system off).
- If persistent: In areas with chronically high or low grid voltage, your installer may need to adjust the inverter's grid voltage limits (this should only be done by a professional and must comply with DISCOM regulations).
Error E006 / E007: Grid Overfrequency / Grid Underfrequency
What It Means:
The grid frequency (normally 50Hz in India) has gone outside acceptable limits. This is rare but can happen during major grid disturbances.
Solution:
This is a grid-side issue. There's nothing wrong with your inverter. Wait for the grid to stabilize. The inverter will automatically reconnect when frequency returns to 50Hz.
Error E008: Grid Fault / No Grid Connection
What It Means:
Your inverter cannot detect the grid connection. This is a common error that can have several causes.
Solutions:
- Check your main meter: Is there a power cut in your area? If yes, your on-grid inverter will show this error until power is restored.
- Check the AC breaker: Has your main AC breaker (near your meter) tripped? Reset it.
- Check your MCB: The miniature circuit breaker (MCB) specifically for the solar inverter might have tripped. Locate it and reset it.
- Check for loose wires: If all breakers are on, there may be a loose connection in the AC wiring. Turn off the system and inspect.
Error E009: Insulation Resistance Low / Ground Fault (Leakage Current)
What It Means:
This is a serious safety error. The inverter has detected that electricity is leaking to the ground, which could mean damaged wiring, moisture ingress, or a faulty panel. Common during the monsoon season.
Solutions:
- Do not ignore this error. It indicates a potential shock hazard.
- Check for moisture: If it's raining or just after rain, wait for the system to dry out. Sometimes moisture in the DC connectors causes this error temporarily.
- Inspect cables: Look for any rodent damage, cracks, or exposed wires on the DC cables from your panels.
- Call a professional: If the error persists after drying, you need a qualified technician to perform an insulation resistance test to identify the faulty component. Continuing to run the system with this error is dangerous.
Error E010: Over Temperature / High Temperature
What It Means:
Your inverter is overheating. This is extremely common in Indian summers, especially if the inverter is installed in direct sunlight or in a poorly ventilated area.
Solutions:
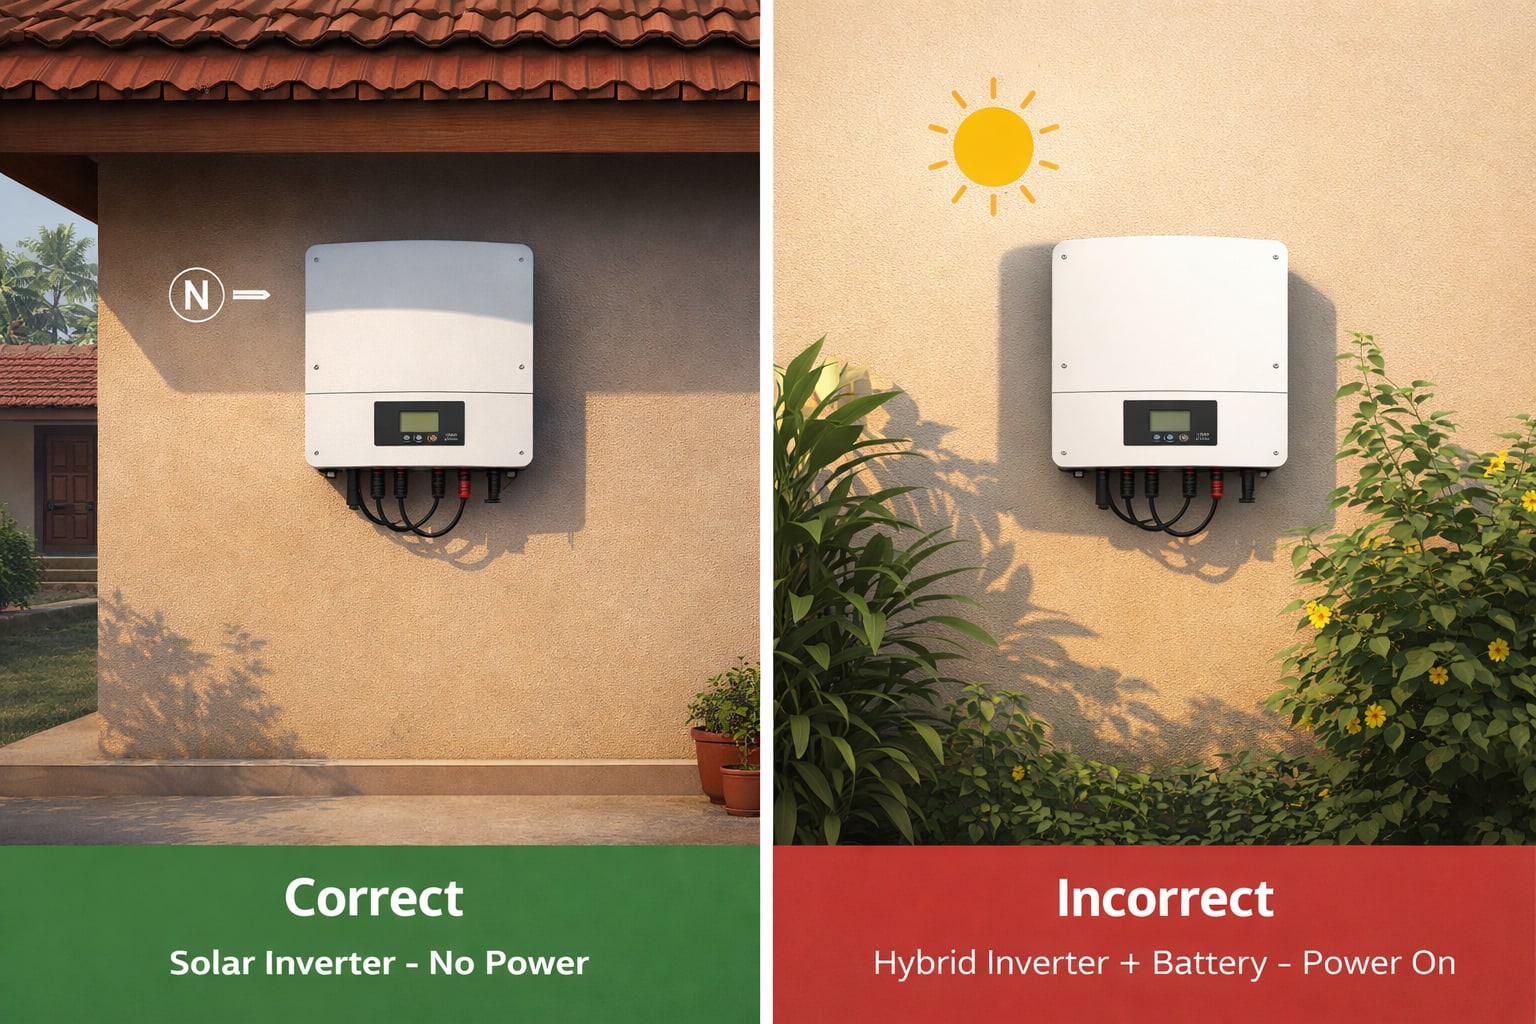
- Check the installation location: Is your inverter in direct sunlight? Install a shade over it (without blocking airflow). The ideal location is a north-facing wall, away from direct sun.
- Check ventilation: Is there at least 30 cm of clearance on all sides of the inverter? Remove any clutter or plants blocking airflow.
- Clean the heatsink: The metal fins on the back (heatsink) may be clogged with dust. With the system off, gently clean them with a soft brush or compressed air.
- Wait for cooling: The inverter will automatically restart once it cools down. If it keeps overheating, consider adding a small fan to improve ventilation.
Error E011 / E012: Communication Failure / No Display
What It Means:
The inverter cannot communicate with its monitoring device (Wi-Fi dongle, data logger) or the display screen is blank.
Solutions for Communication Failure (E011):
- Check your Wi-Fi router. Is it working? Restart it.
- Ensure the Wi-Fi dongle is securely plugged into the inverter.
- Reset the inverter (turn DC and AC off, wait 2 minutes, turn back on).
Solutions for No Display (E012):
- Check if the DC isolator switch (from panels) is ON.
- Check if the AC breaker is ON.
- If there's power but no display, the LCD screen may have failed. Contact your installer for warranty service.
Error E013: DC Bus High / Low
What It Means:
The internal DC bus voltage inside the inverter is outside normal range. This can indicate a component failure.
Solution:
This is usually an internal hardware issue. Turn the system off and on once to reset. If the error returns, contact your installer or inverter brand service center. This often requires repair or replacement under warranty.
Error E014: Fan Failure
What It Means:
The cooling fan inside the inverter is not working. Inverters have internal fans that activate when temperatures rise.
Solutions:
- Listen for the fan. Can you hear it running? If not, it may be jammed with dust or dead.
- If the error appears intermittently, the fan may be struggling. Clean any visible dust around the fan vents.
- If the fan has failed, the inverter will overheat and shut down. This requires professional replacement of the fan. Most brands sell replacement fans.
Error E015: Relay Failure
What It Means:
The internal relays that connect and disconnect the inverter from the grid have failed.
Solution:
This is a critical internal hardware failure. Do not attempt to fix this yourself. Contact your installer or the brand's authorized service center immediately. The inverter will need to be opened and the relay board replaced or the entire unit swapped under warranty.
Brand-Specific Error Codes (Luminous, Growatt, Sungrow, Microtek, etc.)
While the codes above cover most situations, here are some brand-specific notes:
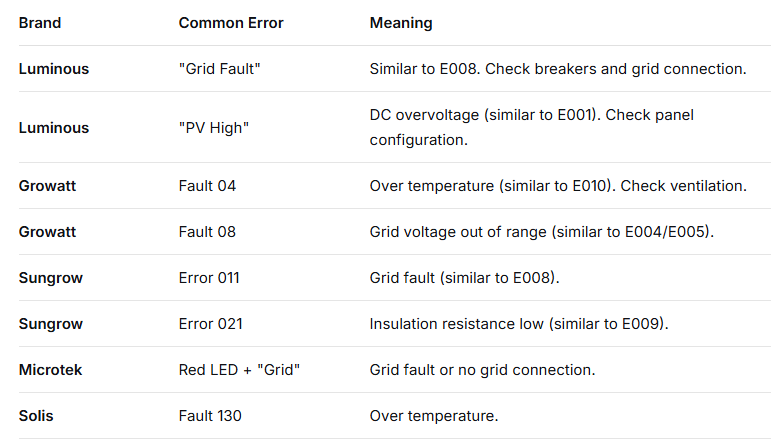
Always refer to your inverter's manual for brand-specific codes.
Quick Troubleshooting Flowchart: What to Do When You See an Error
Follow this simple process:
- Note the error code (take a photo with your phone).
- Check your home: Is there a power cut? Are other appliances working?
- Check your breakers: Is the AC breaker (solar to mains) ON? Is the DC isolator (panels to inverter) ON?
- If it's a voltage/frequency error (E004-E008): Wait 10-15 minutes. The grid often stabilizes.
- If it's an over-temperature error (E010): Check if the inverter is in direct sun. Clean the heatsink. Wait for it to cool.
- If it's an insulation error (E009): If it's raining, wait. If dry, call a technician.
- For any other error: Turn the system off (DC and AC), wait 5 minutes, turn back on. This reset fixes many temporary glitches.
- If the error returns immediately after reset, call your installer.
When to Call a Professional Installer
While many errors can be resolved with simple steps, some situations require expert help:
- Any error that returns immediately after a system reset
- Insulation resistance (E009) errors that persist after drying
- Any burning smell, smoke, or visible damage
- Relay failure (E015) or DC bus errors (E013)
- If you are uncomfortable or unsure about any troubleshooting step
Keep your installer's contact number handy. Most reputable installers in India offer warranty support and can guide you over the phone.
Preventive Maintenance to Avoid Inverter Errors
The best way to deal with error codes is to prevent them in the first place.
Keep It Cool and Clean
- Install your inverter in a shaded, well-ventilated area, preferably on a north-facing wall.
- Clean the exterior and heatsink every 3-6 months with a soft brush or compressed air.
- Ensure at least 30 cm clearance on all sides for airflow.
Monitor Your System Regularly
- Check your inverter display or monitoring app once a week.
- Note your daily generation. A sudden drop can indicate a developing problem.
- Many inverters send email or app alerts for errors—enable these notifications.
Schedule Annual Professional Inspections
Once a year, have a qualified technician:
- Test insulation resistance
- Check all DC and AC connections for tightness
- Verify grounding is intact
- Inspect panels for damage or soiling
The PM Surya Ghar Subsidy and Warranty Support
If your inverter is under warranty (most come with 5-10 years), repairs or replacements may be covered. Under the PM Surya Ghar: Muft Bijli Yojana, registered vendors are required to provide warranty support. If you're experiencing persistent errors, contact your original installer first. If they are unresponsive, you can escalate to the inverter brand's authorized service center.
Keep these documents handy for warranty claims:
- Original invoice
- Warranty card
- Installation date proof
- Photos of the error code
Conclusion: Don't Panic – Most Inverter Errors Are Fixable
Seeing a blinking red light and an error code on your solar inverter can be alarming, but most errors are either temporary grid issues or simple problems you can fix yourself. By understanding what the codes mean and following this troubleshooting guide, you can quickly diagnose the issue and often resolve it without waiting days for a technician.
Remember the golden rules: note the code, check your breakers, check the grid, reset the system, and call a professional if the error persists. With proper maintenance and prompt attention to errors, your solar system will continue to save you money and power your home reliably for years to come.
Keep this guide bookmarked or printed near your inverter. It might just save you a service call and keep your home powered through the next summer heatwave.


